

My favorite Sourdough making tutorials are by Hendrik at the-bread-code.io. He is an Engineer by trade and his scientific explanations and approach appeal to me. Summarised below is what I need to remember from his U-tube demonstrations. I am not going to emulate the full instructions.
What you will Need
- Starter - the culture of bacteria and yeast which will give your loaves of bread their texture and flavour.
- Cadge some from a friend, keep it in a sealed jar in the refrigerator until you are ready to make your first loaf.
You Knead SourDough sells starter kits.
A friend of mine also successfully sent some of my starter to her sister via the post.
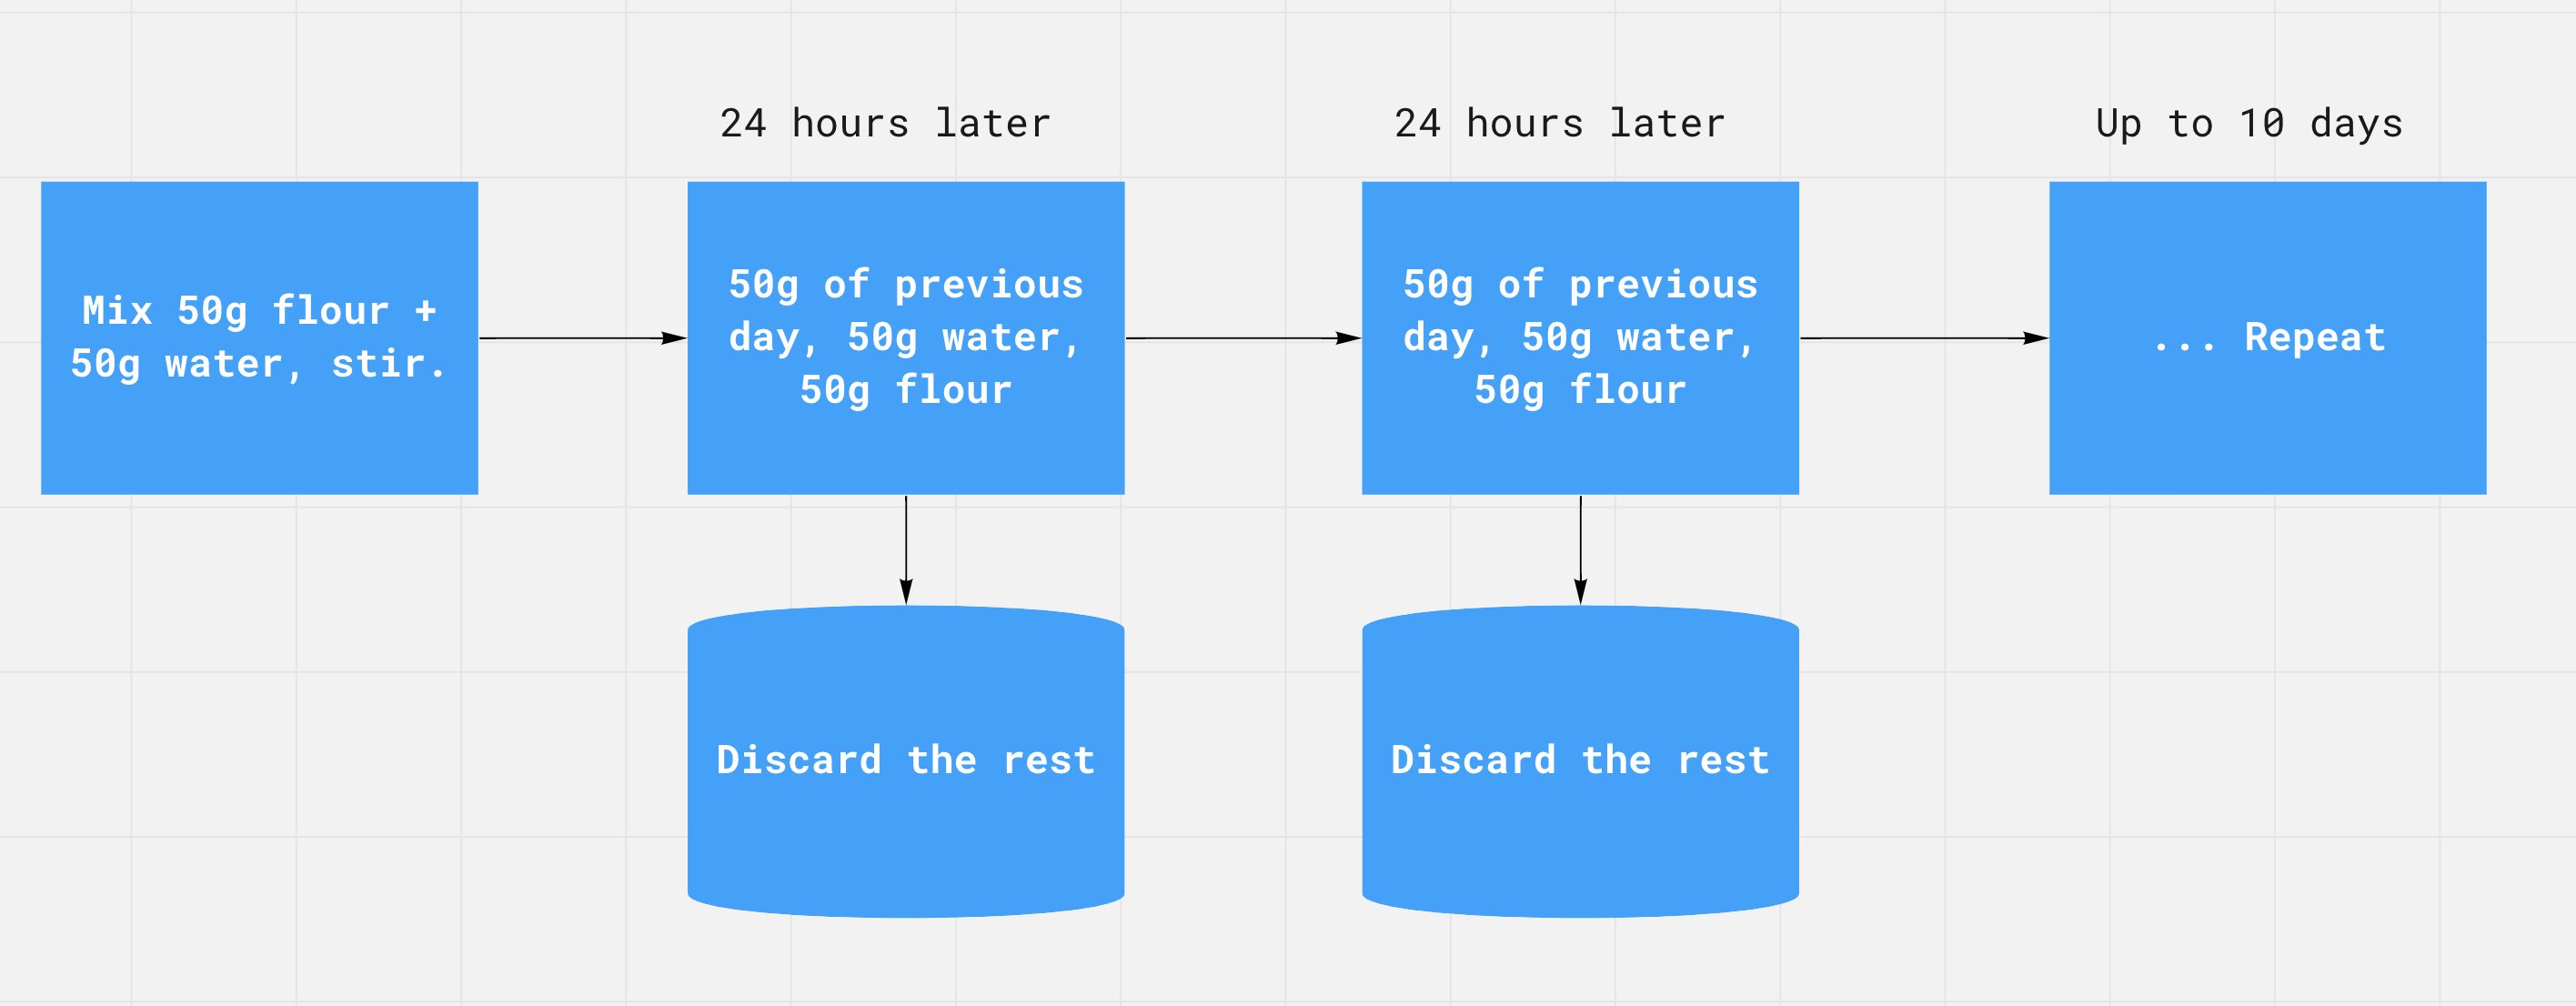
Alternatively make your own starter using Hendrik's sourdough starter making guide.
-
Quality bakers flour with a high protein content, ideally 15%. The flour I buy in bulk varies between 11 and 13% protein, so I supplement it with the 75% protein gluten flour. For example I use 477g bakers flour and 23g gluten flour to make my 500g loaf.
- A dutch oven to use at the baking stage. A large stainless steel roasting pan (with lid), a large stainless steel cooking pot or any solid heat proof vessel with a lid will work. A dutch oven is not essential, but it does help to manage the crust to your liking.
Feed the Sourdough Starter
- 10g of starter from the fridge
- 50g wholemeal flour
- 50g room temperature water
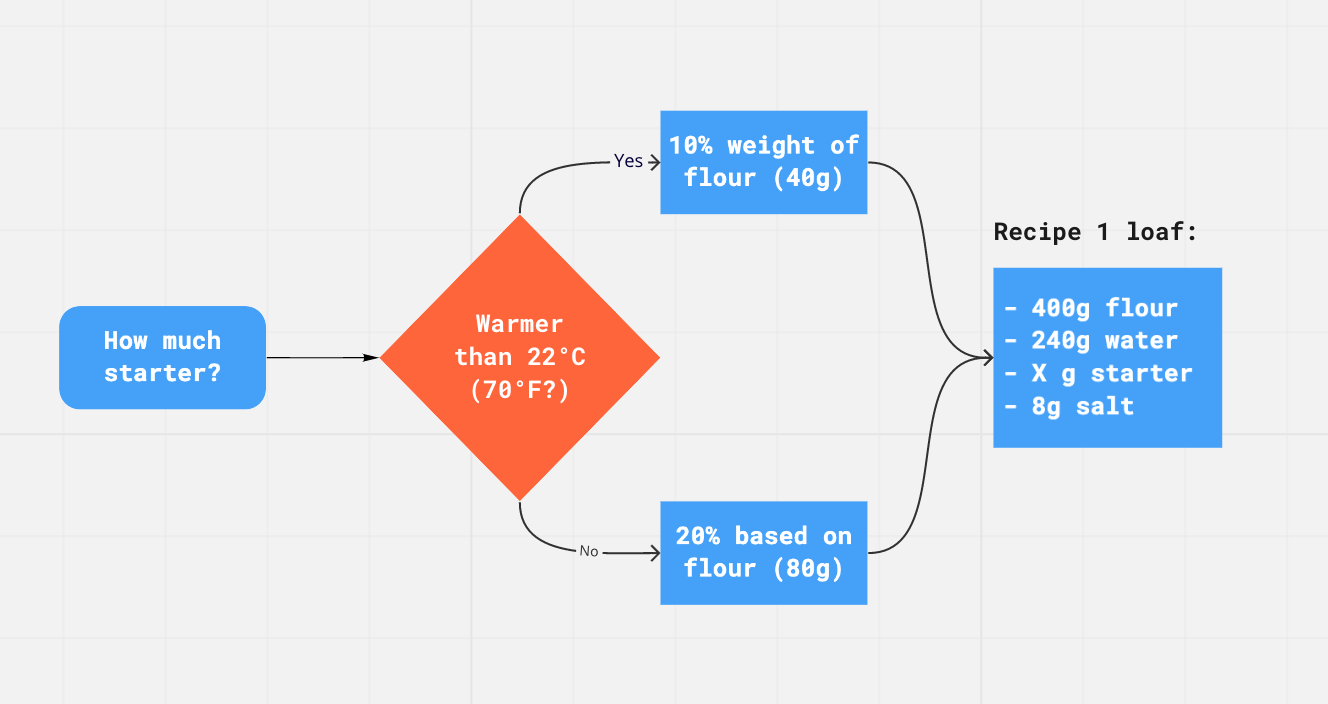
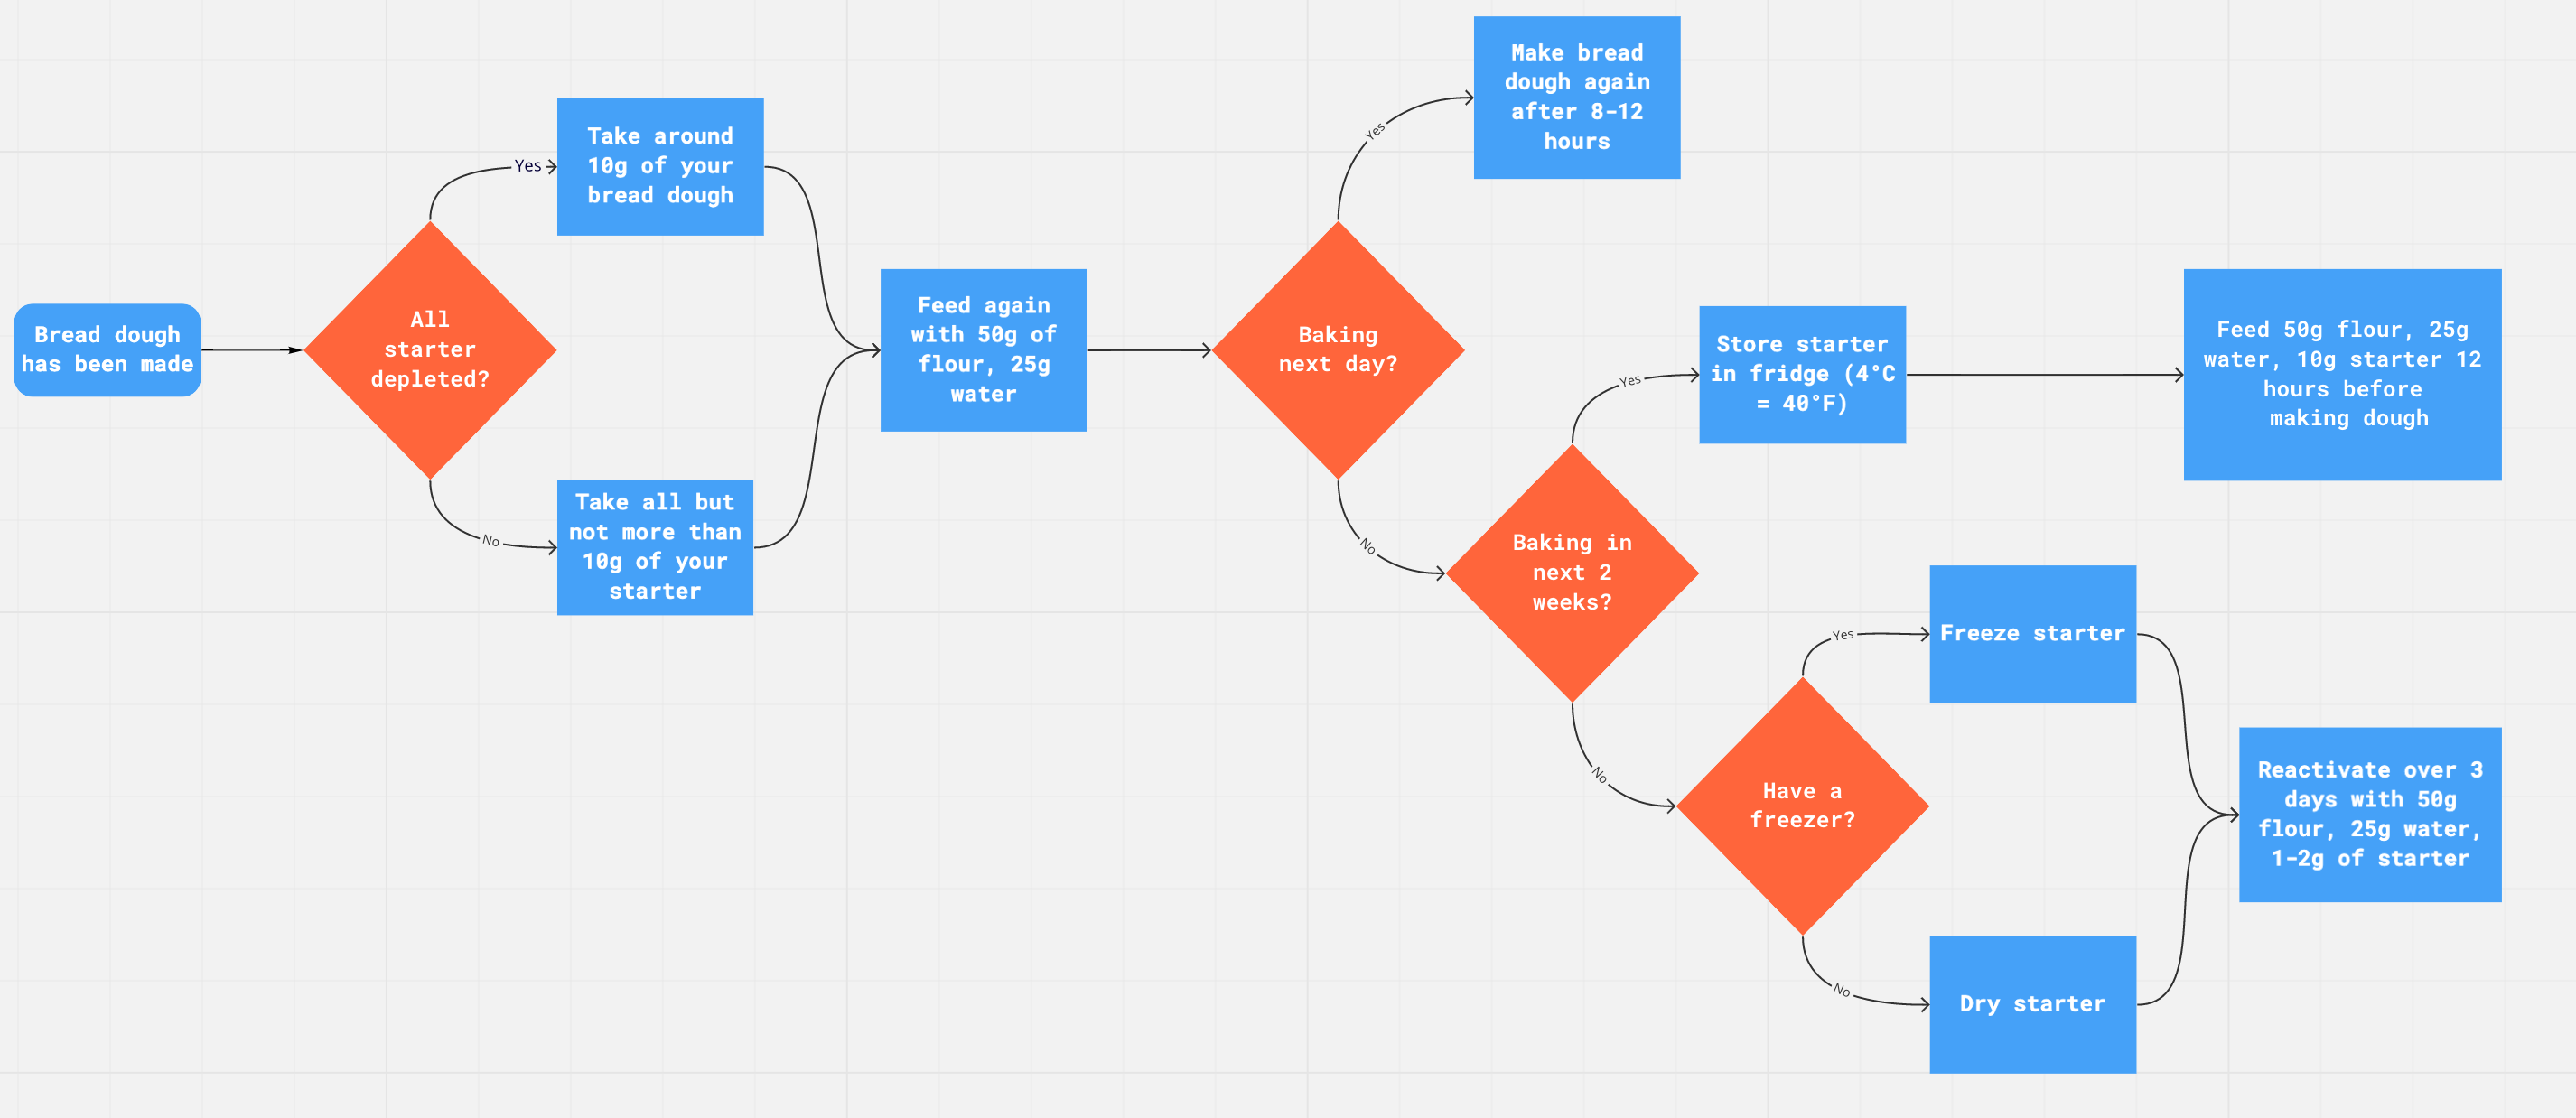
When the mother starter in the fridge is getting a bit old (goes watery on top), feed as above to produce enough mother to keep you in supply. Discard the rest of the watery starter. See Hendrik's sourdough starter maintenance flowchart for a detailed guide.
The flow chart has 1:5:2.5 starter:flour:water whereas I prefer a 1:5:5 ratio of starter:flour:water because the more liquid starter mix is easier to handle. It is more moist than a normal dough though which does effect the amount of water you need to add to make your dough.
A more frequently fed starter is going to be more active. When I think the mother is on its last legs, I use some of the extra starter which was fed and left overnight to make a loaf with to feed the spare 10g again in order to create a new mother. Let the new mother start to ferment for a couple of hours (or more) at room temperature, then put it into the fridge to be ready to use in a day or so.
Make the Bread
- Prepare the starter as above - overnight
- Mix the dough - in the morning
- Work the dough - a bit of time now and then during the day
- Bulk Fermentation - most of the day, until a sample has doubled in size
- Final shaping - some time late afternoon or in evening
- Refridgerate overnight
- Bake in pre-heated oven, preferably in a well heated dutch oven 240 degrees C
- Leave to Cool for 1 hour or more prior to cutting into it.
Mix the Dough
Ingredients, 500g of flour loaf:
- 477g plain white bakers flour
- 23g gluten flour
- 10g salt
- 100g starter which is 1:1 flour and water based
- A drop of honey added to the starter (its early mornng "wake-up")
- 310g water at room temperature
Method:
- Measure dry ingredients into a large bowl or pot<./li>
- Measure the quantity of water, and mix it with the starter and honey.
- Add the starter and water mix to the dry ingredients and combine.
- Let the roughly combined mixture sit for at least 15 minutes then mix into a proper dough consistency. The dough will mix a lot easier after sitting for a while, but it is optional as to whether you leave it sit or just work harder at getting it mixed.
Work the Dough
- Leave to rest for 20 minutes
- Work the dough. If it is sticking to your hands, moisten your fingers/hands. Try not to have excess moisture being added to the dough as that will exacerbate the problem.
- Repeat the previous two steps, at least once, or maybe two more times
Bulk Fermentation
- Remove about 1/2 tablespoon of dough and squash it down into a shot glass or a cook's measure or any small straight sided clear container which will allow you to judge when the sample has doubled in size.
- While the sample is rising in its measuring glass, leave the dough to ferment also, but whenever it flattens out a lot (at least once during this time), stretch and fold it to develop the strength in the gluten.
- Don't stretch and fold during the last 2 hours of this fermentation stage (i.e. when you think the sample is 1 and 3/4 of the original size, it might be time to let the dough rest.).
Shape the Dough
- Round the fermented dough up on the bench - leave for 15 minutes.
- Pull out the dough (without tearing it) to a rectangle, fold up two opposite long sides axcross te middle, then roll up the folded 3 layers of dough in the other direction.
- Shape the dough as desired for the final loaf and place upside down into a banetton or right side up in a parchment paper lined container.
- A basket lined with calico which has been moistened and then sprinkled with rice flour works well as a banetton.
- A parchment lined saucepan of a suitable size is good for when I want to make a round loaf. In this case the dough goes into the pan the right side up and the parchment paper needs to be oversize so the dough can be gently lifted out of the pan, and again into the oven.
- Cover (shower cap?) and leave to proof for 30 minutes at room temperature.
- Place in refridgerator overnight.
Bake the Loaf
- Pre-heat the oven and the Dutch oven to 240 to 260 degrees celsius. Make sure the Dutch oven gets up to temperature by leaving it at least 30 minutes after the temperature has been reached.
- When the oven is ready, remove the dough from the fridge, and get it onto a flat tray with excess parchment paper underneath it. Treat the dough gently! The extra paper length is essential for lowering the dough gently into the pre-heated dutch oven.
- Using a lame or a moistened very sharp knife, slash the dough at 45 degree angle to it's surface. Note Hendrik has a U-tube video on this!
- Get the dough into the dutch oven, lid on and back into the oven as quickly as possible - retaining as much oven temp as possible.
- Bake for 20 minutes with the lid on at 240 to 260 degrees.
- Remove the lid, letting the steam out of the oven, and bake a further 15 minutes.
Cool the Loaf
When the loaf is baked, remove from the oven and place on a wire rack for at least an hour for it to cool before cutting into it. Cutting it too soon will destroy the loaf!
For details of how to stretch and fold or otherwise work the dough I recommend you refer to Hendrik's pages, but you might also like some of the resources linked to in my first version of a refererence for making SourDough bread. My first loaves were made along the lines of the Feasting at Home instructions. They were mostly very successful, but until I found Hendrik's pages I was only guessing at the reasons for the variations between the loaves.